


Building a Dog Box
Featured: July, 2002
I didn't see anything that had the features I wanted, or the right dimensions, so my home-made dog box was born.
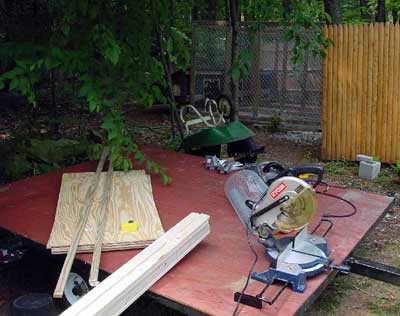
This box is designed to fit in the back of a Jeep Cherokee. I started by measuring the back opening and it was clear that it had to be under 43" wide and under 27" deep and under 24" tall to still be able to see with the rear-view mirror. I then drew a rough sketch and a list of materials and decided on overall dimensions of 42" wide, 24" tall and 24" deep.
Supplies needed:
- 1 sheet 1/2" plywood
- 40 feet of 1" x 3" pine strapping
- 1 - 2' x 5' roll of 3/4" galvanized fencing
- 1 box of 1-1/4" galvanized decking screws
- 1 8' piece of pressure treated 1" x 2" for the bottom.
- 4 hinges
- 2 latches
- 2 handles
- 2 eye screws (for hitching the tie out chains to).
- 1 section of rugged 5' x 10' tarp
- 1 sheet of 2" black letters for fancy personalization. :)
The total bill at Home Depot was almost $60
I started by cutting out the front, back and sides from the plywood.
front and back 42" x 24"
sides 24" x 24"
middle divider 24" x 24"
Then I sketched out where the (12"x9") doors and the (5"x12") side vents were to be; drilled a pilot hole and cut them out with the jig saw. Then I cut out the galvanized screen for the side vents one inch bigger than the cutout on all sides. I then cut out a frame from the plywood to cover the edges of the screen on the inside, to protect the dogs from the sharp screen edges.
Then I connected all sides with the 1"x3" strapping in all inside corners of the box -- to screw to.
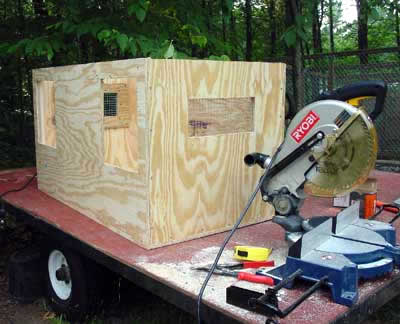
I then built the doors from the 1" x 3" strapping screwed into the original door cutouts (take the original door cutouts and cut out the center -- making them a frame, to attach the galvanized screen to).
Then I used the strapping to reinforce all the joints and also to have a place to screw in the hinges and latches.
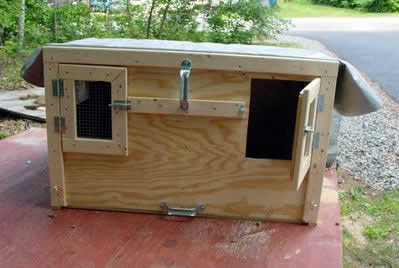
Then attach around the bottom, the 1" x 2" pressure treated to protect the bottom from any dampness.
Then attach the two heavy duty handles (for picking the box up out of the truck and carrying it around easier).
Screw in the eye-bolts a couple of inches up from the bottom front (to attach the tie out chains when it's used as a dog house). The doors also come off by pulling out the pin in the hinges. This also comes in handy when using it as a dog house.
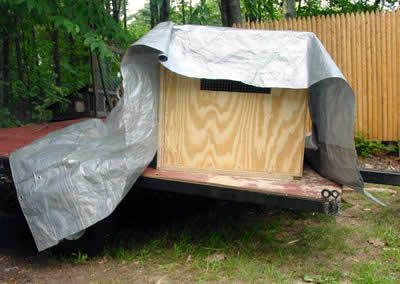
Then fold the piece of tarp in half (this is to cover the box to protect it from the elements), and attach it to the top/front of the box wrapped on a piece of the 1"x2" and screwed on with the deck screws. Half of the tarp will fold down over the front of the box to keep the weather out and the box dry, and the other half of the tarp will fold over the back for the same purpose. The tarp will hang over each side 5 or 6 inches to protect the air vents and box sides from getting rained on.
Attach the roof, throw in some straw as bedding, put on some fancy lettering (of course, this is optional *smile*) and we're done.
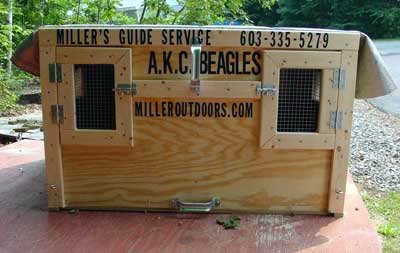
The finished product...
I don't claim to be much of a carpenter, but I managed to complete this in about 3 or 4 hours -- and spent about $60.
I hope this helps someone out there, or at least gives them an idea to build on when building a dog box. If you find this plan useful or helpful, send me an e-mail and let me know how it went and any modifications that you made to make it better.
Enjoy your hounds!
Chris Miller
Miller Outdoors
